Install Paralism node
Download
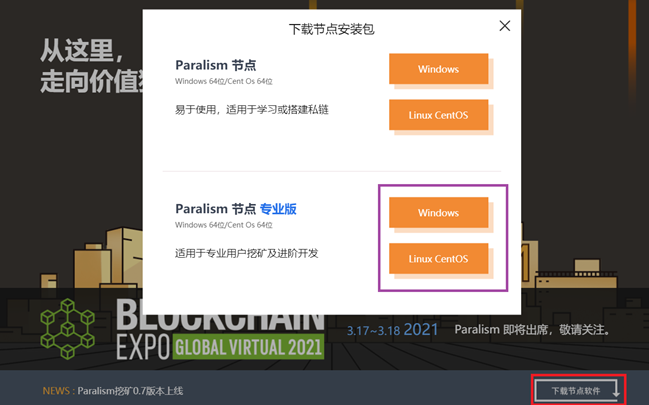
Access https://www.paralism.com Click on the node download link on the homepage and choose to download the Paralism node professional version. Choose Windows or Linux based on your host system.
Windows Environment Installation
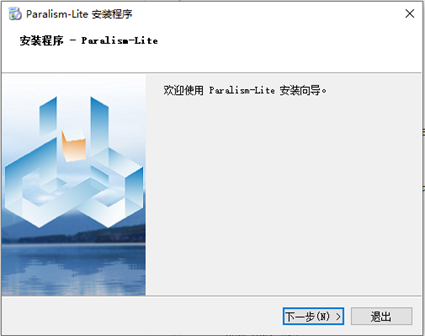
Run the downloaded installation file, enter the installation wizard interface, and click the “Next” button.
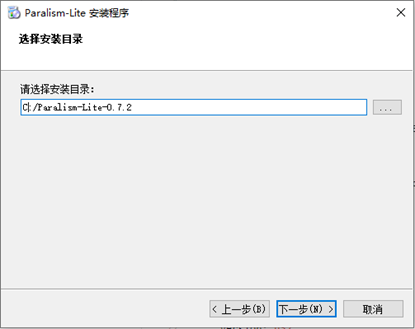
Select the installation directory for the node program. The default installation path is on the system C drive. It is recommended to use another disk partition for installation and separate it from the node’s data storage directory to avoid accidental deletion of node data and wallet data. After setting the installation directory, click ‘Next’.
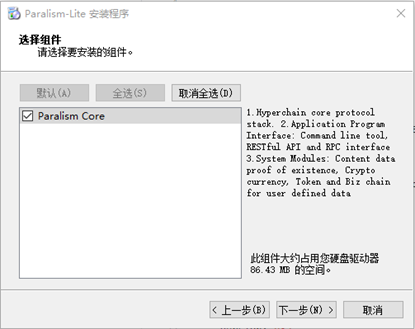
Select the components to be installed in the node system software, select the default configuration, and click ‘Next’.
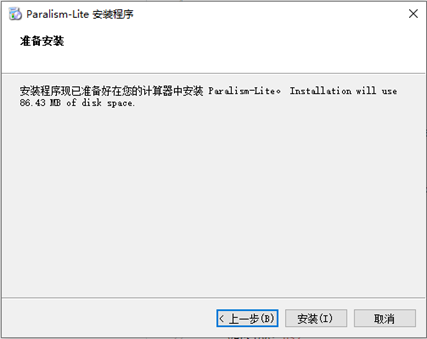
Confirm that the partition where the program is installed has storage space and click ‘Next’.
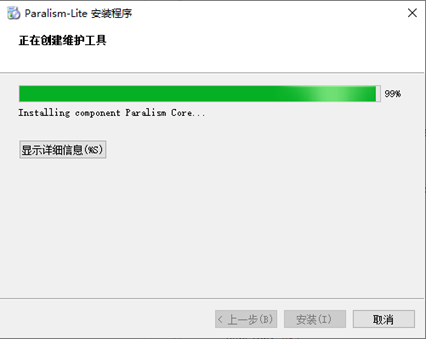
Check the installation progress and click ‘Next’ when completed.
Installation completed, click on the ‘Finish’ button.
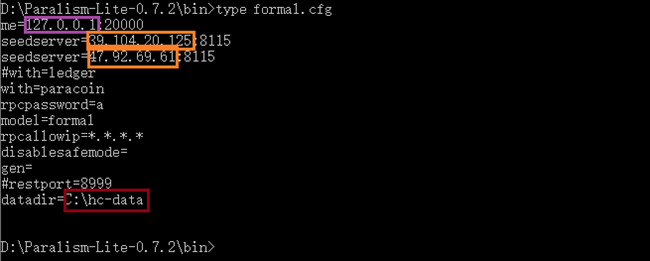
Enter the bin directory of the Paralism node program installation path and refer to information.cfg to edit the user-defined startup configuration file and save it. For example, customize formal.cfg to configure the local IP and program listening port, boot the server, and store blockchain data in the directory. As shown in the following figure.
Start the Windows terminal cmd command line, enter the bin directory with the cd command, and enter hc. exe – conf=formal. cfg to start the node program.

Installing under CentOS
Copy the downloaded node rpm package to the prepared installation directory.

Installation requires root privileges. Sudo enters the root state and enters rpm – ivhto start the node software installation.

After the installation is completed, enter the command ll and the bin folder will appear, which is the directory where the node software stores the execution files.
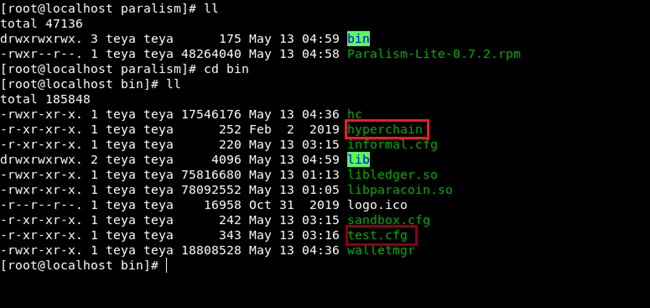
In the bin directory, hyperchain is the executable file for node startup, test.cfg is the startup configuration reference file, and users can write custom startup configuration files using gedit or vim.
After editing the configuration file, enter/ Hyperchain conf=. cfg Start the node to run.

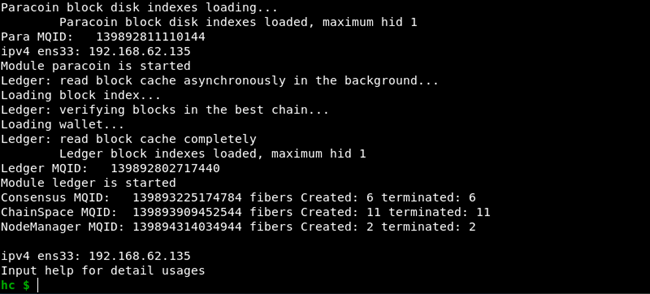
If the ‘with’ field in the configuration file specifies the loading of the paracoin module, the terminal displays’… paracoin is started ‘after the node starts, indicating that the node can start normally and the paracoin application is loading normally.
Node program startup parameters
The node program is hc.exe for Windows and hyperchain for Linux, with the same startup parameters. The startup parameters are as follows:
- -me configure the IP address and UDP communication port of this node, with a default value of 20000.
- -seedserver configures the Cryptocurrency chain boot node IP address and UDP communication port.
- -daemon runs in the background and is currently open under Linux
- -model configures the network type for accessing the Paralism basic network, with information representing the test network and sandbox representing the sandbox network.
- -with select to load and run the mining Cryptocurrency component, the leader represents the distributed ledger currency, and the paracoin represents the mining Cryptocurrency.
- -datadir configure the mining node data storage location for datadir.
- -rpcledgeport sets the RPC access port for distributed ledger components, with a default value of 8119.
- -rpcparaport sets the RPC access port of the Cryptocurrency component. The default value is 8118.
- -rpcallowip configures the IP address whitelist for RPC access, with a default IP of 127.0.0.1.
- -rpcuser sets the username for accessing nodes through the RPC port.
- -rpcpassword sets the password for accessing nodes through the RPC port.
- -conf sets the node startup loading configuration file, which contains startup parameters.
Guidelines for Establishing a Private Chain
Prepare two hosts, Windows or Linux unlimited, with seedservers specifying each other as the boot server. Start a node first, for example:
hc.exe -me=192.168.1.23:8999 -model=sanbox -with=ledger -with=paracoin -rpcpassword=a -rpcallowip=*.*.*.* -gen -datadir=.\2 -server=78999 -pangu
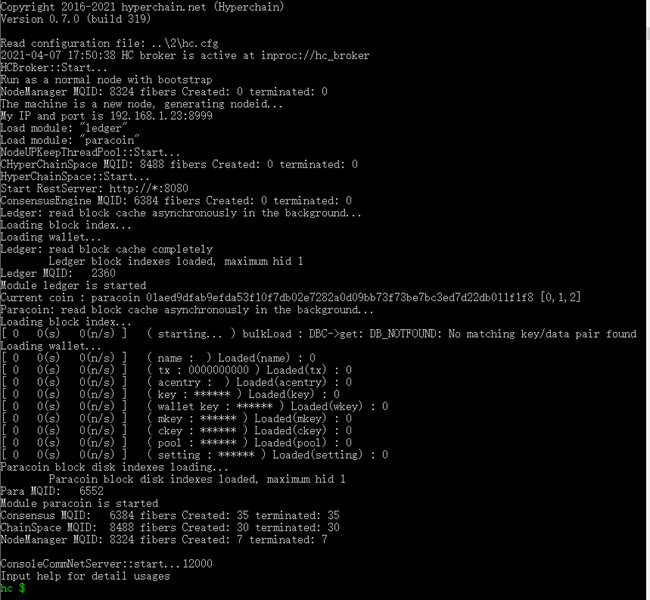
After the node is started, it enters the hc $Command-line interface, which indicates that the startup is successful.
Start another node on a Linux host and set it to the daemon daemon process for remote monitoring and management, such as:
./hc -me=192.168.1.195: 8999 –seedserver=192.168.1.23:8999 -pangu -with=paracoin -rpcpassword=a -rpcallowip=*.*.*.* –server=12000 -gen -daemon
Successfully starting the node will connect to the first node for networking.
The command to remotely connect and view the running status of Linux nodes under Windows is as follows:
hc.exe –connect=192.168.1.195:12000

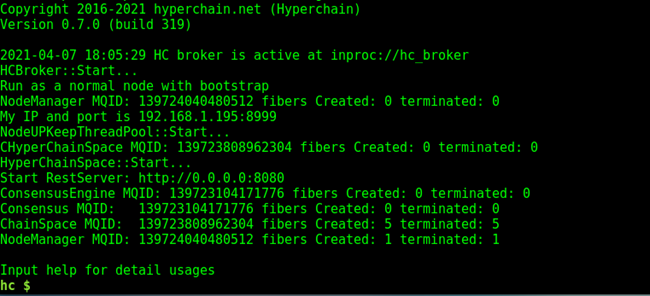
After the node is connected, entering the hc $Command-line interface indicates that the connection is successful.
Node operation command reference
- help(?): show all available commands
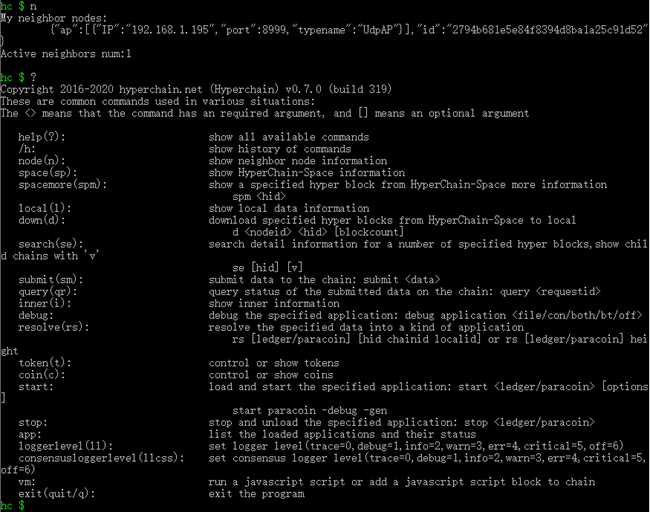
- /h : show history of commands 。
- node(n): show neighbor node information

- space(sp): show HyperChain-Space information

- spacemore(spm): show a specified hyper block from Hyperchain Space more information

- local(l): show local data information

- down(d): download a specified hyper block from HyperChain-Space to local

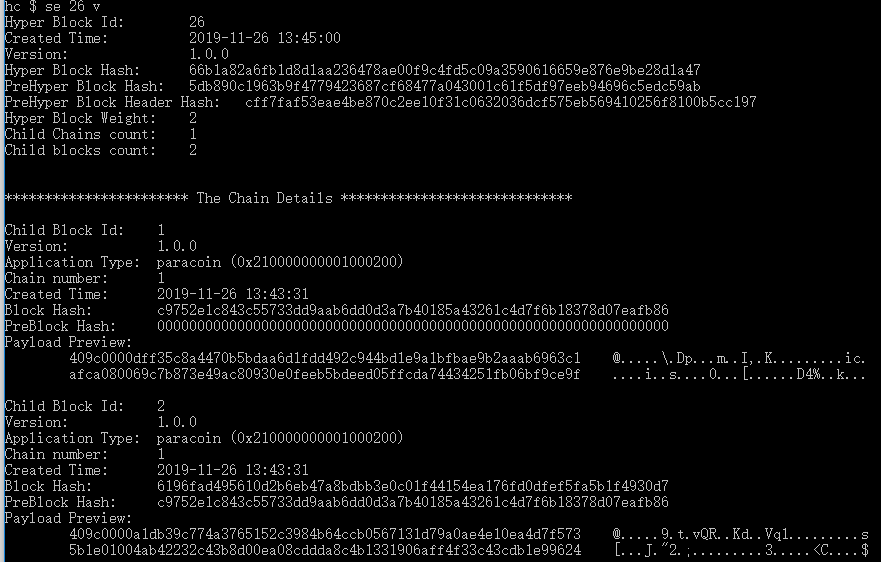
- search(se): search detail information for a number of specified hyper blocks, show child chains with ‘v’
- submit(sm):submit data to the chain

- query(qr):query status of the submitted data on the chain

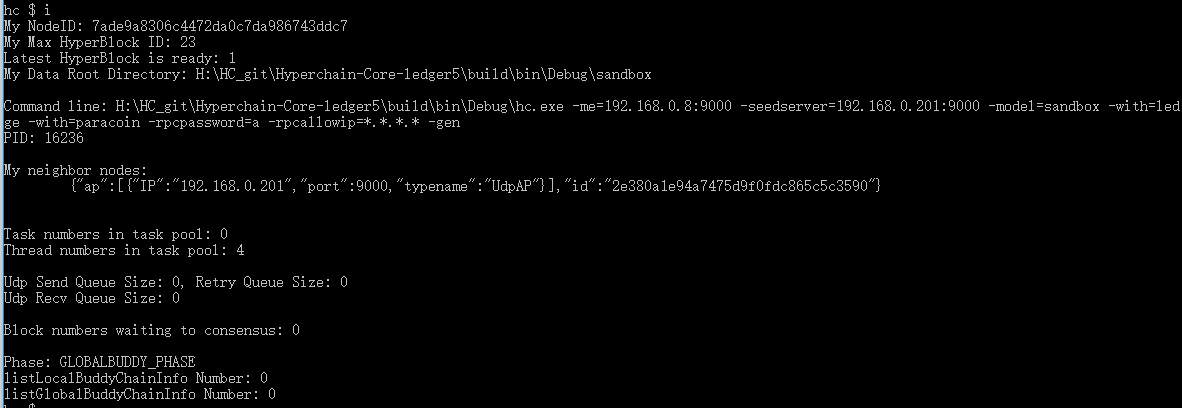
- inner(i): show inner information
- debug: set debug application log output destination.

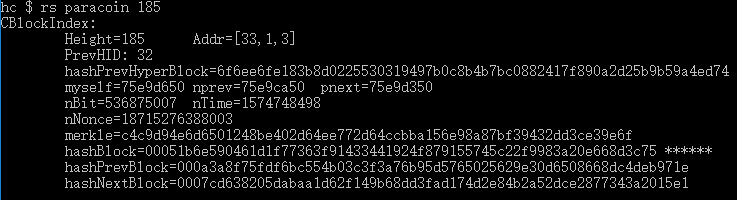
- resolve(rs): resolve the specified data into a kind of application
- token(t):control or show tokens
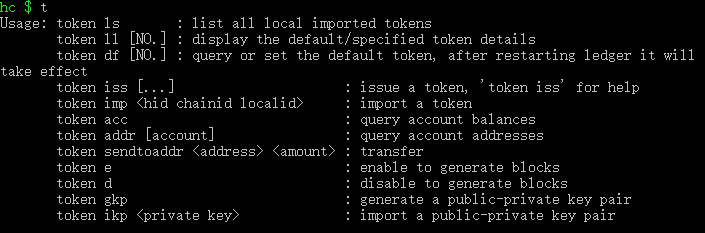
- token ls:list all local imported tokens

- token ll :display the default/specified token details

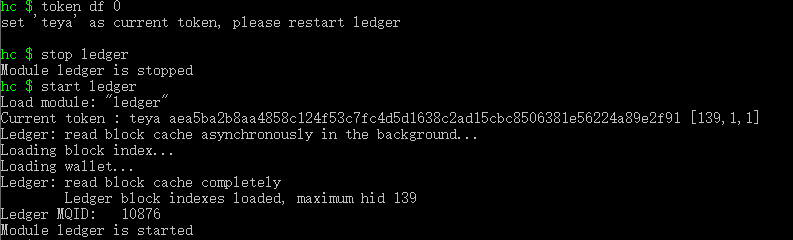
- token df:query or set the default token, after restarting ledger it will take effect
- token iss: issue a token, ‘token iss’ for help

- token imp:import a token

- token acc: query account balances

- token addr: query account addresses
输入token addr + [account],获取token账户的地址。
- token sendtoaddr: transfer

- token e: enable to generate blocks
- token d: disable to generate blocks
- token gkp: generate a public-private key pair

- token ikp: import a public-private key pair
- token ls:list all local imported tokens
- coin(c):control or show coins
- coin ls: list all local imported coins

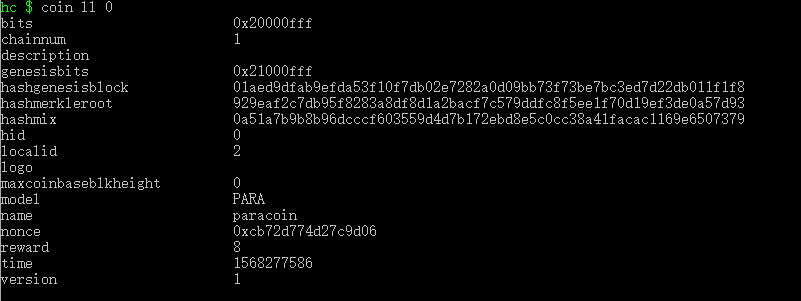
- coin ll : display the default/specified coin details
- coin df: query or set the default coin, after restarting paracoin, it takes effect

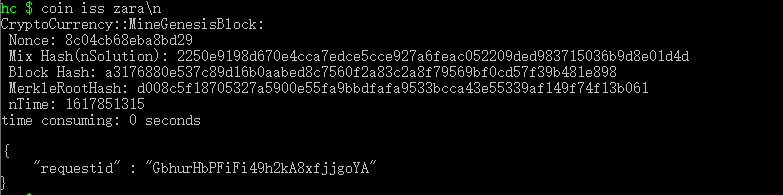
- coin iss: issue a coin
- coin imp: import a coin

- coin acc: query account balances

- coin addr : query account addresses

- coin sendtoaddr: transfer

- coin e: enable mining

- coin d: disable mining

- coin ls: list all local imported coins
- start: load and start the specified application:
start ledger/paracoin [options]
start paracoin -debug –gen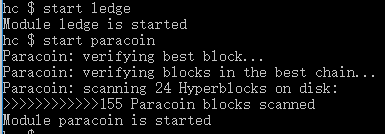
- stop: stop and unload the specified application:
stop ledger/paracoin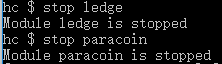
- app:list the loaded applications and their status

- loggerlevel(ll): set logger level [trace=0,debug=1,info=2,warn=3,err=4,critical=5,off=6]
- consensusloggerlevel(llcss):
set consensus logger level
[trace=0,debug=1,info=2,warn=3,err=4,critical=5,off=6] - vm: run a javascript script or add a javascript script block to chain
vm run -f Debug the. js contract code file
vm run + contract code snippet, debugging contract code snippets
vm + add/addmodule+Deploy contract to the chain
vm + call + [hyperblockid chainid localblockid] calls the smart contract deployed on the chain.
For example, store the following smart contract code in the hcvmtest.js file and place it in the bin directory:
——————————————————————————————————————————————————class Student {constructor(name,sex, age) {this.name = name;this.sex = sex;this.age = age;}toString() {return 'The Student is ' + this.name + ', and sex is ' + this.sex + ', age is ' + this.age;}}var s=new Student("bob", "male", 18);s.toString();
——————————————————————————————————————————————————
Enter vm run – f hcvmtest.js after hc $to run the contract code:
After hc $, enter vm add – f hcvmtest.js to deploy the contract on the chain, obtain a query handle, and successfully deploy. Obtain the parallel chain triple address of the contract on the chain through the query handle, and then use the vm call command to call:
- exit(quit/q): exit the program
